Into a bowl, pour in the water. I have used room temperature – Water. Then add in the salt and yeast. Stir until salt and yeast dissolve in water.Add in the flour.
Combine together to form a shaggy mass of dough. Make sure the whole flour is hydrated properly.
Cover the bowl
Let the dough rise for about 2 hours in a warm place.
After 2 hours, deflate the dough and smoothen the dough using our hands.
Feel the dough and make sure the dough doesn’t have any lumps and it is smooth.
Now cover the bowl and keep it in fridge for cold proof.We can use this dough anywhere between 6 hours to 4 days from the fridge.This is a very flexible time.However, for getting the best flavor to our bread, it is advisable to use the dough between 18 hours to 3 days; from the fridge.
Preshape the dough
After 18 hours of cold rise in fridge, take the dough out from fridge. The dough has risen. You will be able to see a few large air bubbles on the surface of dough.
Dust the top of the dough with some flour. Then detach the dough from sides of the bowl using a silicon spatula.
Flip the bowl on to a well floured work surface.The dough is very relaxed and can easily be stretched to form a thin sheet of dough.Now fold the dough from both sides and then from top to bottom and then from the corners to the center as in the video.
Then flip it on to a non dusted surface. Drag the dough from top to bottom and shape it to form a tensive dough ball.
Cover the dough and let the dough rest for 45 minutes.
Shape the dough
After 45 minutes, the dough has slightly flattened and now it is ready for shaping.Simply flip the dough on to a floured work surface with the help of a bench scraper.
Gently flatten the dough. Take care not to deflate the lovely air pockets formed inside.
Pull and fold the dough from both the sides and then from top to bottom and then flip it onto a clean work surface.
Drag the dough from top to bottom with cupped hands and form a dough ball to create some tension inside.
Transfer the dough on to glass bowl lined with a parchment paper or on to a banneton for second proofing.
Let the shaped dough rise for the second time again in fridge. It may take 35-40 minutes. Wait for until the dough get good rise. When you poke the dough with your finger, it should spring back very slowly.So after the second rise (after 35-40 minutes), the dough is now ready to get into the oven.
Place the dough onto the 250 C or 480 F preheated dutch oven or we can use any oven safe vessel with a lid.
At this point, you can score the bread using a sharp knife to help the dough expand well in the oven and to get a classic artisan look to the bread.
Bake the bread inside the hot dutch oven (480 F or 250 C) for 25 minutes with the lid on.
After 25 minutes of baking, remove the lid and reduce the oven temperature to 425 F or 220 C.
And then bake for another 20-25 minutes without the lid at 425 F or 220 C, until the top of the bread is nice and golden brown.
The more you bake at this point,the more crispy the crust become.This extra baking will give that outer crust of the bread to get a more crisp and caramelized golden brown color and a nutty flavor.
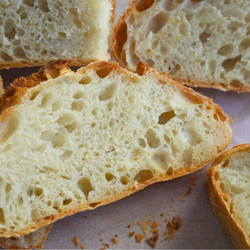
You will be rewarded with a Bread, with a thin, crunchy brown crust and airy, soft and tender crumb inside. The bread is slightly chewy, flavorful and perfect texture.