:Step 1: Heat Milk
Heat milk to 🔥 185 degrees F (85 degrees C) 🔥 This is pasteurising the milk and is important for creating a thick, nicely textured yogurt.
:Step 2: Cool Milk
Cool milk back down to lukewarm ❄️ 110 degrees F (43 degrees C) ❄️ then add 1 cup of the warm milk into the yogurt. (Ensuring the milk is cooled down will prevent you from killing the live cultures in the yogurt.)
If you don't have a home thermostat, stick your finger in it, so that it is not too cold and not too hot for your finger. the hotter the milk, then the yogurt will be more sour the yoghurt.
:Step 3: Add Starter
Whisk the yogurt and milk together, then add the rest of the milk and mix well. Add to a clean container (sterilised is best, glass mason jars are good, I re use 1L yoghurt containers that I clean really well, flush with hot water and wipe out with a spray of isopropyl alcohol but just well cleaned and rinsed with boiling/hot water should be fine too)
:Step 4: Let Sit
Place your mixture somewhere warm and let sit for ⏰ 6 to 12 hours ⏰ or until yogurt is thick and tangy. My favourite method for making yogurt is to wrap the jar in a warm, moist towel, then setting it in the oven with the oven light on. The light will provide enough heat to ferment the yogurt! (See note about oven lights at end of recipe**)
After sitting in a warm environment for a few hours, your yogurt is ready to eat! If you want to turn this plain yogurt into thicker Greek yogurt, we’ll take it one step further and strain it.
:Step 5: Strain
Set a mesh sieve lined with cheesecloth (I used chux cloth, you know the ones that come on a roll, they worked great! /or/ strong paper towels) over a large bowl. Pour in yogurt and place in the fridge. Check every few hours until yogurt reaches your desired thickness. You can also secure a cheese cloth over a brown with rubber bands if you don’t have a sieve.
The liquid that is drained out of the yogurt is whey! This is a great protein and works well in smoothies and soups/sauces.
:Step 6: Transfer
Divide your freshly made Greek yogurt to one or more airtight containers (now is a good time to put it into serving size portions if using for lunches etc) when it has reached your desired thickness level, Your yogurt is ready to enjoy! Serve it plain, or with your favourite toppings and flavours.
I’ve read some people flavour their yoghurt in the process of making it (adding vanilla bean etc) but I’ve never tried doing that and am unsure how it would effect the development of the live cultures/texture etc.
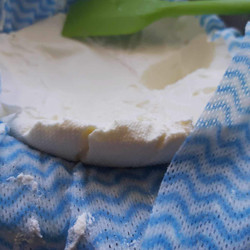
As you can see from the image attached I LOVE super thick Greek yoghurt! You don’t need to make it that thick I’m just a serial lid licker and enjoy it that way. I have found when making this recipe for making Naan or cooking Butter Chicken etc (I will add my recipe for easy 2 ingredient Naan bread to my profile also) it is best not to drain the whey/thicken the yoghurt.
🥣 It will last in the fridge up to 2 weeks, make sure to keep some yoghurt to make your next batch with! (Keep in mind live cultures do start to weaken after 3 days in the fridge)
*It’s best to use milk with some fat in it to give your homemade yogurt a nice texture. I’d recommend doing a blend of skim and blue if you are going to try for a low fat homemade yogurt.
🚫🐄 You can make non-dairy Greek yogurt, Making non-dairy yogurt at home is another ball game and requires a different way to introduce live bacteria (in the form of probiotic supplements!)
My friend made non dairy yoghurt for her dairy intolerant child and said it was a bit different in texture etc, I’ve never tried it myself, I’ve heard coconut milk is a good go-to. I will add a recipe for dairy free Yoghurt to my cooked.one profile 😊
The fresher the milk the better it is to make yoghurt but you can still use milk that’s needing to be used up.
I found this oven method better than using a slow cooker or even yoghurt maker!
🦠 I also use a starter that says “live cultures, acidophilus & bifidophilus” on the ingredients list.
**This won’t work if your oven light is LED! 💡 💡 💡
If you are not sure if your oven light is a bulb or LED, test it with a bowl of water. Take the temperature of the water every hour to see if it stays constant.
Before starting the fermentation process, you can test the actual temperature of your oven with the bowl of water method mentioned above. If the light gets too hot, open the door slightly to let the heat dissipate.
It is fine without, but if you have a pizza stone/oven/heat stone you can put that in the oven while getting it to low temperature as it will help keep a consistent temperature while incubating the yoghurt.
!!Can be smart to put a note on the door so that no one accidentally turns on the oven!!